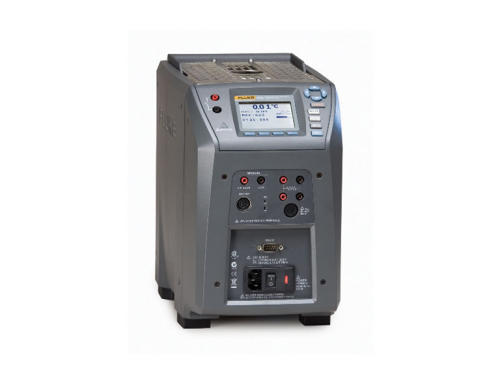
Fluke 9142 – Temperature Heat Block (-25ºC and 150ºC)
The Fluke 9142 for hire has built-in features to address large workloads and common applications Whether you need to calibrate 4-20 mA transmitters or a simple thermostatic switch, a Field Metrology Well is the right tool for the job.
Each process version accepts an ITS-90 reference PRT. The built-in readout accuracy ranges from ± 0.01 °C to ± 0.07 °C depending on the measured temperature. Reference PRTs for Field Metrology Wells contain individual calibration constants that reside in a memory chip located inside the sensor housing, so sensors may be used interchangeably. The second channel is user-selectable for 2-, 3-, or 4-wire RTDs, thermocouples, or 4-20 mA transmitters. For comparison calibration, don’t hassle with carrying multiple instruments to the field. Field Metrology Wells do it all as a single instrument.
Traditionally, calibrations of temperature transmitters have been performed on the measurement electronics, while the sensor remained uncalibrated. Studies have shown, however, that typically 75 % of the error in the transmitter system (transmitter electronics and temperature sensor) is in the sensing element. Thus, it becomes important to calibrate the whole loop—both electronics and sensor.
The process option of Field Metrology Wells makes transmitter loop calibrations easy. The transmitter sensor is placed in the well with the reference PRT and the transmitter electronics are connected to the front panel of the instrument. With 24 V loop power, you are able to power and measure the transmitter current while sourcing and measuring temperature in the Field Metrology Well. This allows for the measurement of as-found and as-left data in one self-contained calibration tool.
All Field Metrology Wells allow for two types of automated thermostatic switch test procedures—auto or manual setup. Auto setup requires the entry of only the nominal switch temperature. With this entry, it will run a 3-cycle calibration procedure and provide final results for the dead band temperature via the display. If you need to customize the ramp rate or run additional cycles, the manual setup allows you to program and run the procedure exactly how you would like. Both methods are fast and easy and make testing temperature switches a virtual joy!
Metrology performance for high-accuracy measurements Unlike traditional dry-wells, Field Metrology Wells maximize speed and portability without compromising the six key metrology performance criteria laid out by the EA: accuracy, stability, axial (vertical) uniformity, radial (well-to-well) uniformity, loading, and hysteresis. All criteria are important in ensuring accurate measurements in all calibration applications. Field Metrology Well displays are calibrated with highquality traceable and accredited PRTs. Each device (process and non-process versions) comes with an IEC-17025 NVLAP-accredited calibration certificate, which is backed by a robust uncertainty analysis that considers temperature gradients, loading effects, and hysteresis. The 9142 and 9143 have a display accuracy of ± 0.2 °C over their full range, and the 9144 display accuracy ranges from ± 0.35 °C at 420 °C to ± 0.5 °C at ± 660 °C. Each calibration is backed with a 4:1 test uncertainty ratio.
New control technology guarantees excellent performance in extreme environmental conditions. The 9142 is stable to ± 0.01 °C over its full range and the mid-range 9143 is stable from ± 0.02 °C at 33 °C and ± 0.03 °C at 350 °C. Even at 660 °C, the 9144 is stable to ± 0.05 °C. But this is not all! Thermal block characteristics provide radial (well-towell) uniformity performance to ± 0.01 °C. Dual-zone control helps these tools achieve axial uniformity to ± 0.05 °C at 40 mm (1.6 in).
Automation and documentation make each unit a turnkey solution So you now have a precision calibration instrument that has field-ready characteristics, accredited metrology performance, built-in two-channel thermometry, and automation— what else could you ask for? How about all this and a turnkey solution that will automate and document the results?
The process versions of Field Metrology Wells have onboard non-volatile memory for documentation of up to 20 tests. Each test can be given a unique alphanumeric ID and will record block temperature, reference temperature, UUT values, error, date, and time. Each test can be easily viewed via the front panel or exported using Model 9930 Interface-it software, which is included with each shipment. Interface-it allows you to pull the raw data into a calibration report or an ASCII file.
SKU: f9142-19
-
Technical Specs
- Range: -25°C to +150°C
- Accuracy: +/-0.2°C (full range)
- Process version accuracy: +/- 0.01°C at -25°C / +/- 0.02°C at 155°C
- Stability: +/- 0.01°C (full range)
- Radial uniformity: +/- 0.01°C (full range)
- Axial uniformity at 40mm depth: +/- 0.05°C (full range)
- Immersion Depth: 150mm
- Heating time (max): 23 min
- Cooling time: 15 min to -25°C
- Size (H x W x D): 290 x 185 x 295mm
- Weight: 8.2kg
- Calibration Certificate
-
Fluke
Fluke United Kingdom is a subsidiary of Fluke Corporation in Everett, Washington.
Fluke Corporation is the world leader in the manufacture, distribution and service of electronic test tools and software.
Since its founding in 1948, Fluke has helped define and grow a unique technology market, providing testing and troubleshooting capabilities that have grown to mission critical status in manufacturing and service industries. Every new manufacturing plant, office, hospital, or facility built today represents another potential customer for Fluke products.
From industrial electronic installation, maintenance and service, to precision measurement and quality control, Fluke tools help keep business and industry around the globe up and running. Typical customers and users include technicians, engineers, metrologists, medical-device manufacturers, and computer network professionals — people who stake their reputations on their tools, and use tools to help extend their personal power and abilities.
Fluke has achieved the number one or number two position in every market in which it competes. The Fluke brand has a reputation for portability, ruggedness, safety, ease of use and rigid standards of quality.
-
Delivery & Collection Information
We use next day couriers to deliver all our test instruments. That means it doesn’t matter if you’re 2 or 200 miles away, we can have the test equipment you need, delivered first thing, next day.
When you have finished with the test equipment we can arrange for the same courier to collect it from you.
We also offer a same day delivery service for when you really need the test equipment urgently.


